Sensational Finds: DIY
Showing posts with label DIY. Show all posts

Monday, February 12, 2018

Under 5 minutes DIYS Using 1dollarthings.com


Hey friends! For todays video, I wanted to share how you can find really affordable DIY supplies at other places then the Dollar Tree! We all love a good deal but it's totally possible to find affordable products at places like Amazon, Walmart, even Etsy!


I was able to turn my favorite website into a dollar store, thanks to the website 1dollarthings.com
1dollarthings allows you to search for live prices of thousands of products on some of the best websites. I searched on Amazon for products under $2 and found some really cool products. 1dollarthings is free to use and the prices they give are always live and up-to date. I would totally recommend searching Walmart's website through 1dollarthings bc I was able to score sneaker for .95cents! Crazy, I know!

Wednesday, May 10, 2017

Dollar Tree DIY Mother's Day Gifts | Best Mother's Day DIY gift under $5

                      
                                             YouTube Video

Hi friends! Mother's Day is almost here, so it's time to shower mom with gifts, love and the best Dollar Tree DIY's Pinterest can find! No worries you don't have to search Pinterest, I did for you! I found the cutest Pins and made them using all Dollar Store items! These Last Minute, Budget Friendly Mother's DIY's are sure to make any mom smile.

                                    Watch the Full Video on how I made all these DIY's


Thursday, March 31, 2016

Easy Dollar Tree DIY- Spring Cloches Using Succulents


Hi Friends! Today we're making a Spring Cloches out of all Dollar Tree items! I share 2 ways you can use succulents and a few other supplies from your local dollar store. This diy is super easy to do and doesn't cost more than a few dollars!


Watch the video here or the video at the top of this post for full instructions!

Monday, November 23, 2015

Dollar Tree Holiday DIYS! Plus an AMAZON GIFT CARD GIVEAWAY!


Hi friends! Today we have 3 Dollar Tree Holiday DIYS! The are simple to make and affordable, which is what I'm all about!


Want a chance to win a $10 Amazon e-card? Go below and follow the rules: All you have to do is be subscribed and share the video on Twitter, Facebook, or Instagram (if you do Instagram please share picture above) You can share it daily for more chances to win!


GIVEAWAY BABY BABY!!

a Rafflecopter giveaway


I hope you guys enjoy the video and get a little Holiday inspiration! Have you started decorating for the holidays???? I would love to hear what you've been making!

Monday, May 25, 2015

NEW DOLLAR TREE HAUL & BIG ANNOUNCEMENT


Hey friends!! Todays video is a Dollar Tree Haul and Taste Test. We try some one the new hot finds from the Dollar Tree and let you know my honest opinion. I hauled a mix of household and food items, but sadly I dont have any makeup to share. My new Dollar Tree is lacking in the beauty department! Watch the video and see what all I brought and what Little B and my Hubby think of Dollar Tree food.


Want to meet me in Seattle Washington August 22nd? I will be at VloggerFair and would love to hangout with anyone that will be there. Purchase your tickets now and use promo code sensationalfinds to get 15% off!! Click this link to go directly there!!


Be sure to follow all of my social media accounts so we can stay connected! Lots of love!


Thursday, October 2, 2014

PINTOBER #1 | MUMMY MASON JAR LUMINARIES


via IFTTT

Hi Friends! Pintober is in full effect and if your not sure what Pintober is, then I will explain. On Youtube during the month of October you post a pin a day. You can recreate, review, or just talk about one. I'm not going to be posting everyday, only on Tuesday, Thursday and possibly Saturday. Be sure your following here and on Youtube because it will make me happy!


To make the Mummy Mason Jar Luminaries you'll need:
Mason Jar or old spagehetti jar
Gause or Cheese Cloth
Adhesive or hot glue
Googly eyes
scissors and a tea light candle
Be sure you go and wath the video to see ow I recreated the pin. Its so easy and a cute craft you can so with your kids. It takes about 10 mins to complete, so there's not a ton of wait time.
This is the pin that I recreated. Follow me on Pinteresf for more pins I love!

Thank you so much for reading!

Thursday, September 25, 2014

THE MOMMY SCENARIO TAG | Find Out What Type Of Mom I Am


Well hello there! I've started uploading videos on Monday, Wednesday and Friday so if you aren't already subscribed, go and do it because your missing out! The last video I did was The Mommy Scenario Tag and let me tell you, it made me question myself as a mom! If you vlog or blog you should do this tag and see what your answers are:

Here's the question:
1.   Your kid is refusing to eat dinner, do you stand your ground and demand they eat what you made or make something else?

2.  Your kid has a melt-down at the store; nothing is working to calm them. Do you leave & come back another time or grit your teeth and finish shopping? 

3.  Your kid gets too many toys for their birthday. Do you make some returns or save them for a 
rainy day? 

5.  You have an appointment and no babysitter. Do you bring them with you or reschedule? 

6.  You have 20 minutes until unexpected company arrives. Do you rush to clean up your messy 
house, or just figure- “hey, it’s okay. I’ve got kids!”

7.   You’re running late & only have time to do your hair or makeup. Which do you choose?

8.   You’re at the park and another child pushes yours. Do you intervene and correct them or go find the child’s parent?


Answer these questions and be sure to leave a comment if any of our answers are the same!!! Let me know what kind if mom you are.

Video link

Subscribe because it would make me happy! Click here

XOXO,
Sarah


Thursday, September 11, 2014

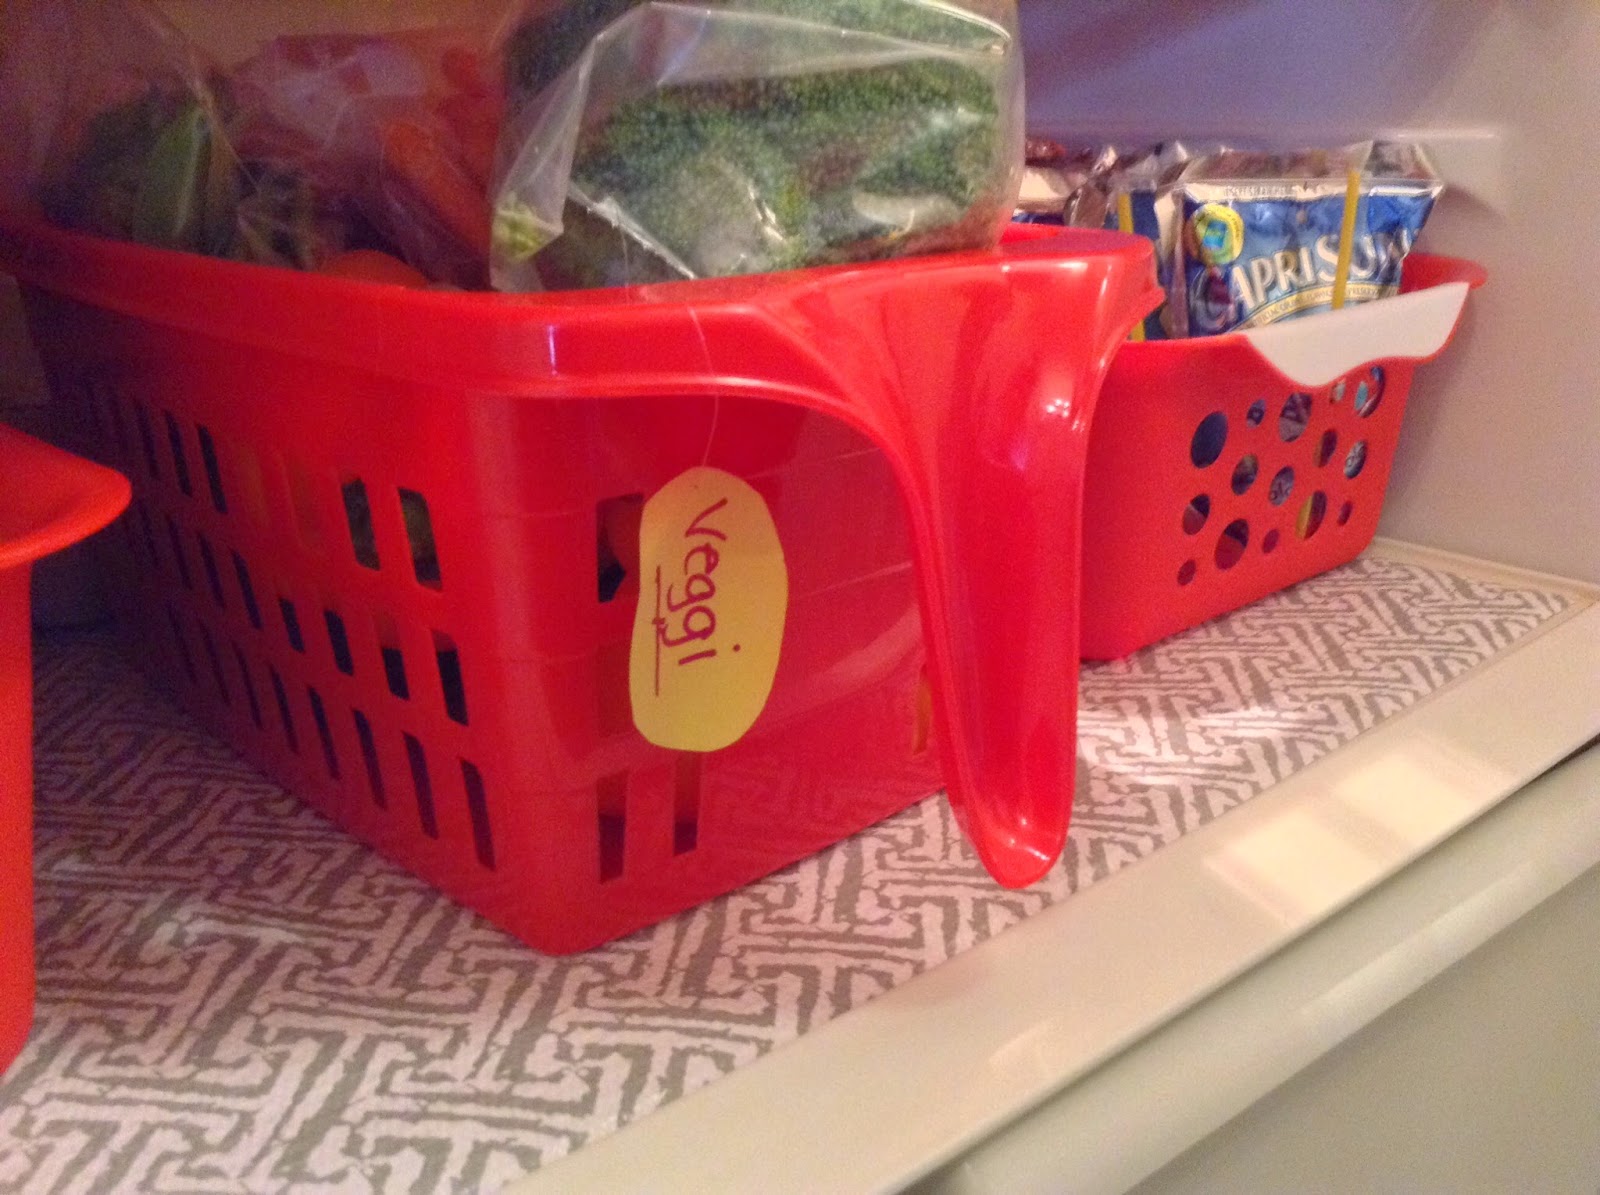
Apartment Sized Fridge Organization For Under $15 | Dollar Tree Storage Bin

                 Click here to watch on Youtube

Hi Friends! If you haven't watched the video that shows you a detailed look inside of my fridge, go watch it! Theb come back for some more pictures and
chit chat!


we live in a small 2 bedroom apartment! Even though we rent I stillaking your space work for you! For myself that means, decorating and organizing my rental to make it feel a home! I was able to completely makeover our fridge and put in place an efficient organizational sytem for under $15. Not only does it look clean and crisp, but everything is contained, labeled, as has it's place or "home". If your unorganized like me, then giving things a home or a certain spot makes it easy to know where things belong! I'm now more likely to put things back where I got them because nothing else is out if place. Also by prepping the fruits and veggies and putting them in plastic baggies rather then what they come in, it gives your everything in your fridge a uniformed look. I love our snack bin! It makes life easier, rather than using bowls when you want a snack, everything is already washed and ready. Bobby is able to go into the fridge himself see what we have and pick a snack and juice box! The baggies are also from the dollar store and I highly buying them to store your fruits and veggies! I love the look of the clear acrylic fridge organizers, but the price was no beauno! I just so happened to find some at our local Aldi's for under $5! So I picked up egg holder and was off to the Dollar Tree to find the rest! Dollar Tree is a dollar store that sells everything for $1.00. They sell some pretty awesome storage items that I use in the entire house, as well as much much more! The key is going often because they restock things frequentl,y next you really need to look in ever isle and finally if you see something you like or kind of like BUY IT, because good chance it won't be there when you come back!

I'm so proud of how this project turned out! Have you organized your fridge, if so let me know what you use to  organize. Be sure to follow my blog as well as Instagram, Facebook, and Twitter . All of those links are at the top of this page! If you like watching videos please go and subscribe to my Youtube Channel channel, because it really would make my day!

So here are some pictures of my completed fridge organization.

Friday, March 1, 2013

Personalized Easter Basket

 photo cdf9776d-24bb-4b79-8ed8-f6bbbb2c2d9a.jpg

Since March is here and Easter is this month, I decided to start thinking about Easter baskets!  We've used the same Easter basket for the past 2 years. It was great when he was small, but now that he's a candy-loving toddler a small basket just won't work. This is a DIY Easter basket that will fit toys and candy!
I found the bucket at the Dollar Tree, they have a couple of different colors available. At just a dollar you can buy a couple in case you mess up! I painted the bucket with acrylic paint (have I mentioned I love me some acrylic paint!) and the fabric ties are from Walmart. I love the way this bucket turned out. For just a few bucks you have a personalized Easter basket, now I'll have more money to spend on what goes inside the basket!


 photo a960e783-6a7c-4c50-ab3e-61cc49970b93.jpg

 photo 3ef26130-c791-4a0e-8793-81774c38cbe4.jpg

Tuesday, February 26, 2013

Easy Easter/Spring Door Wreath


Hi Friends! We're getting ready for the Spring/Easter season and recently changed our door wreath. I wanted to show you how I did our super easy DIY wreath.

I always use the same wreath for each season. By using the same wreath every season it saves me quite a bit of money. When the season is over and the wreath is taken down, I place all the wreath decor in a zip lock bag so I can use it again the next year. 
 photo 50da3b b1-0c94-44ec-aa7e-0036529867cf.jpg
 photo b07238c4-2844-488f-a227-78e07c06c790.jpg


 photo fa50a01d-6b82-4a30-826a-00209e425928.jpg

 photo dcee936a-2fae-41ef-bcb6-e1a8a7905d8f.jpg


All of the flowers were apart a large bouquet of silk flowers, instead of buying individual silk flowers. This is the best thing to do, unless your looking for a certain type of flower. Then all you do is arrange the flowers how you want them on the wreath, and hot glue them to the wreath!

 photo 84c0d1a4-8ce5-4d3b-9354-62c6eeaa8d09.jpg
This is exactly how the wreath looks from the front door.


What have you done to get into the Spring spirit?

Thursday, December 20, 2012

Our Christmas Tree including DIY Ornament Tip


Hi friends! Just when I thought I was back to posting regularly, I had to go drop my tablet in a sink full of water! I thought I was seeing things, like my tablet really couldn't just be sitting in water, It was. Luckily we had insurance and thats why I've been gone for so long. So lets keep our fingers crossed for no more issues!
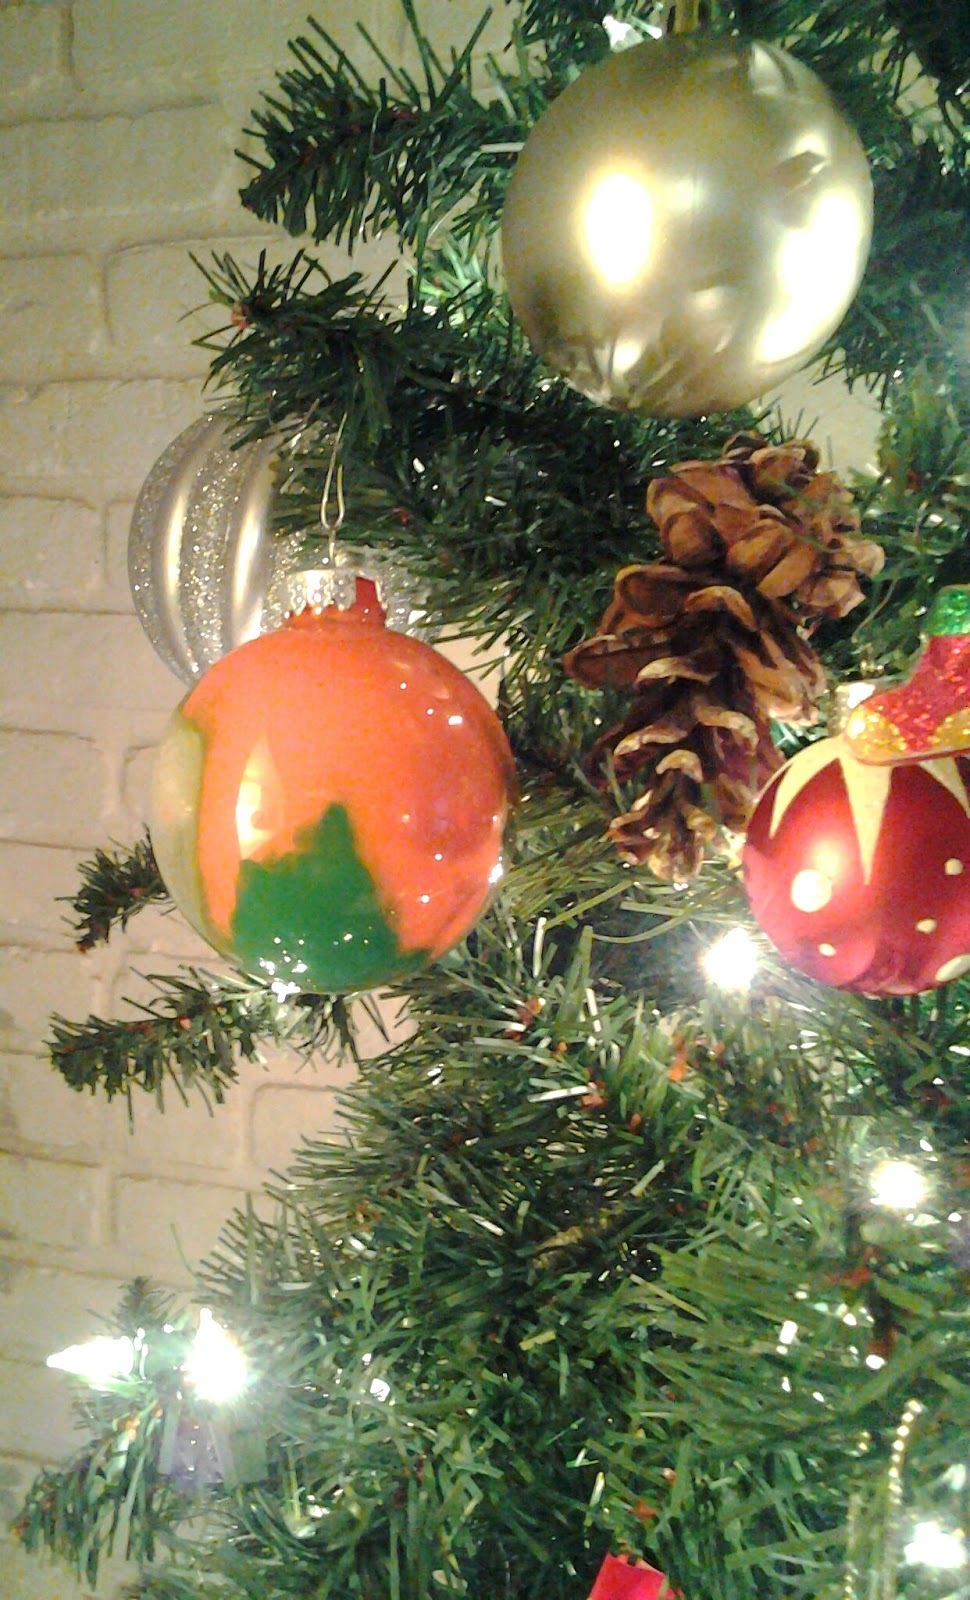
I love seeing the way people decorate their Christmas tree. I would say our tree is an eclectic style, we have a variety of ornaments and special touches.  One great way to add your own touch is making your own ornaments.

What you do is purchase clear ornaments for any craft store. Stock up now! It's the perfect time since they'll be on sale, you can store them away until next year. Then get any color acrylic paint I will say this, glitter paint sucks! It was clumpy and too opague for what I wanted. Pick at least 3 different colors to give some variety. Now, all you have to do is place paint INSIDE the ornament, swirl it around to coat the entire inside. Beware that the paint will run before drying. You'll have one of a kind balls that give your tree an ecletic look.


I added glitter feathers, branch, pine cones and picture to the more traditional collectible ornaments. I love how our tree reflects our family. It's fun, laid back with a touch of traditional. I love seeing all the new trends this year, but when I look at our tree I see memories and that makes me happy!


I would love to see how you decorated Christmas tree! Leave a comment or tweet me below with your blog link,

Saturday, April 14, 2012

Smart and Sassy Keys!


Hi Friends! I hope your having an amazing weekend. I want to share a little project that's quick but cute. I'm always confused by all the different keys I have on my key ring, and of course I could buy one of those colored thing, but that's boring! I saw this on Pinterest, and had to do it. Adding glitter to your keys is a great way to tell the difference between keys, while looking girly and cute. Smart and Sassy!  I love glitter, like who doesn't?!?


Here's what I used;
Glitter Glue ($1.00 at Joanne's Fabric)
Glitter ($1.00 at Joanne's)
Clear nail polish
Your key


Take the glitter glue and outline the top of the key. The more glue you use, the clumpier it will look, so try not to use too much.


This is what it will look with the glitter glue. You could always stop here, but I wanted more glitter!


While the glue is wet, dip it into the glitter. You might have to do the entire top of the key. Make sure to shake off the excess.


Tada! You have a blinged out key. Your going to repeat the same steps for the opposite side. The last add clear nail polish to both sides. This will help keep the glitter in place.


Here's how silver and gold look. I really like the gold key!
::note to self:: Paint my nail tonight, my nails are a hot mess lol


If you want to see where I got my Pinspiration click here. I'm off to finish my cleaning because tomorrow we're taking B to the zoo for the first time. It's supposed to be in the 80's, so it should be a great day. Anyone doing anything this weekend? Regardless have a great day, and thanks for reading!

I'm giving away a $50.00 Amazon gift card on the 5minutesformom blog party so make sure you go enter and follow me on twitter @Sensation_Finds to hear the winner!